
Introduction
You can manage your integrations with Salesforce from within CustomerGauge, allowing you to pull, and flag from multiple Salesforce objects at once, or push survey responses to Salesforce in real-time.
Please note that this is a highly technical feature, and is designed with Salesforce Developer in mind.
- If you're a business user, please align with your Salesforce Development team on the data you need.
- If you're a developer, please align with your business team on the data needed, prior to implementing the integration.
TABLE OF CONTENTS
- Introduction
- Available Salesforce integrations
- Requirements
- Preparation
- Creating a Salesforce Integration
- Settings
- Authentication
- Pull Query
- Pull Mapping
- Flag Mapping
- Activation
- Examples
- Testing if data enters CustomerGauge correctly
- Send a survey to Contacts that haven't been pulled yet
- Pull Contacts to send a Relationship Survey every quarter
- Getting additional Account data for reporting purposes
- Send a survey when a Case in Salesforce gets closed
- Send a Win/Loss survey when an Opportunity gets closed in Salesforce
- Troubleshooting
Available Salesforce integrations
You can use our Salesforce integrations Pull data to send surveys, Push survey responses as they get completed, or use both of those integrations. Regardless of what you're looking to do, the Authentication is the same.
- Native Salesforce Integration (Pull):CustomerGauge can connect to your Salesforce system to 'pull' data into CustomerGauge to send surveys.
- Flag: As part of the pull, you can optionally update fields from the main object you're pulling from, indicating that the record has been pulled by CustomerGauge.
- Outgoing Webhook (Push): CustomerGauge can create or update a record in Salesforce, in real-time, the moment a survey gets answered.
Requirements
- Access to your Salesforce account
- Highly recommended: a Salesforce Architect or Administrator
- Salesforce username & password
- Active Campaigns set up in the Campaign Suite
- DIY Troubleshooting: In case you ever get stuck, have a look at the most common issues, and how to solve them!
- Your Pull Query will need to have matching data in your Salesforce system.
Preparation
- Prepare a list of all objects and fields you want to Pull (getting data from Salesforce into CustomerGauge)
- Know your business needs:
- Decide whether you'd like to pull data into CustomerGauge, push back data into Salesforce, or go both ways;
- Identify which fields and objects are going to be used from Salesforce;
- Identify which fields are going to be used in CustomerGauge (your Account or Implementation Manager can help you identify these);
- Prepare any custom objects and fields you may want to use for Flagging and Pushing back survey results (pushing back data from CustomerGauge into Salesforce).
How to prepare a list of fields
We highly recommend identifying relevant fields in CustomerGauge to get a clear overview of all your needs. This will also be helpful for your technical team in understanding the business use case. For this, we usually create a table in a spreadsheet, as displayed in the simple example below;
| CustomerGauge Field | Salesforce Object | Salesforce Field | Purpose | Notes |
| Contact | Pull | Must be a valid email address. Will be used to send survey invitations by email. | ||
| First Name | Contact | First Name | Pull | The First Name of the Contact being surveyed. |
| Last Name | Contact | Last Name | Pull | The Last Name of the Contact being surveyed. |
| NPS Score | Survey Results | NPS Score | Push | The NPS Score that the contact gives on the Survey. |
| Comment | Survey Results | Comment | Push | The open text feedback that the contact might have given on the survey. |
Note: these fields serve as an example – your use case will not be limited to these fields, and will differ depending on your use case. Also, please be aware of your system's field requirements. These can be viewed by System Administrators in Field Settings.
Finding your Salesforce Fields
In Salesforce > Setup, visit the Object Manager, select the relevant Object(s), and copy over the Name of the Object in your spreadsheet. Go to "Fields & Relationships" to view the Fields of the object. Copy over the "Field Label" from this list into your spreadsheet.
Creating a Salesforce Integration
When you're ready to get started and you've done all the necessary preparations, navigate to Data → Integrations. To set up a new integration, click the 'New Integration' button in the top-right of the screen, and select Salesforce. You can have multiple Salesforce integrations active at the same time, connecting to one or more Salesforce systems to cover all your relevant touchpoints and business units. From here on out the steps will be the same between Creating and Editing, and the next steps can be followed from the rest of this article.
Settings

The Settings step allows you to name your integration, and set the base.
- Integration Name: This setting allows you to give a name to your integration. The hardest part of technology is naming things, and we recommend to be as descriptive as possible. For example, if you're setting up a live Won/Lost survey integration for your Netherlands business unit, you could name this as 'NL Won/Loss - Enterprise'.
- Pull Frequency: The pull frequency allows you to set up with which frequency CustomerGauge will connect to Salesforce to pull data and send out surveys. You can either pull with hourly, or daily frequency. The pulls typically happen around the changing of the hour.
Authentication

The Authentication step allows you to choose which Connected App you wish to use to connect to Salesforce. This essentially controls which Salesforce system you are connecting to. Be careful in choosing the correct Connected App to avoid retrieving inaccurate data.
Switching between Sandbox and Enterprise
Changing the Connected App from your Sandbox authentication to your Enterprise authentication allows you to set your integration "live", pulling from your Enterprise system.
Testing Recommendation
We recommend building out your integration using a Salesforce Sandbox environment first, prior to switching it to Enterprise.
Pull Query

The displayed query is displayed for demonstration purposes only and does not represent a real use case.
The pull query allows you to write your SOQL query to define which data should be pulled to send surveys. We highly recommend referring to the Salesforce documentation when writing your query.
To learn more about SOQL, read here: https://developer.salesforce.com/docs/atlas.en-us.soql_sosl.meta/soql_sosl/sforce_api_calls_soql.htm
To learn more about using date fields in your WHERE clause, read here:
https://developer.salesforce.com/docs/atlas.en-us.soql_sosl.meta/soql_sosl/sforce_api_calls_soql_select_dateformats.htm?search_text=update
Ensure there is data to pull
Your Pull Query will need to have matching data in your Salesforce system. As part of saving your Pull Query, we run the query on your Salesforce system to validate that the query is correct. This will not result in data entering the CustomerGauge system, but we do store the first record for display purposes in the next steps.
Note: if your query contains nested objects / custom relationship objects, the first record must contain data for each of the fields in that object, otherwise you will not be able to map those fields in the next step.
Pull your flag fields
Any fields that you wish to Flag should be added to the SELECT clause of your SOQL query. When saving your query, we will validate that we can access all the fields and that your query can be executed. You do not have to add the Flag fields to your Pull Mapping (unless you wish to add this data to your survey records).
Pull your object identifiers
If you are looking to push survey responses back into Salesforce, and you want to relate them to, for example, the Account in Salesforce, make sure you Pull and map the Account Id, and any other identifiers needed later on.
Testing Recommendation
While testing your integration, we recommend adding a WHERE clause that targets a single test record, or single test account.
Pull Mapping

The Pull Mapping allows you to map the fields from Salesforce to their respective places in CustomerGauge, just like you would in a Multi-Object Import.
Required Fields
Any fields required in your CustomerGauge system will be automatically added. Do note that there are some additional required fields, depending on the context of your integration and campaigns.
- To use Campaign Suite Campaigns, provide a valid Delivery Vector. This is best done by using a Static Value (more on this below) - unless you have a preferred contact method in Salesforce. Here's a quick summary of the different options:
- sms
- personal-link
- Ensure that you're pulling and mapping the fields used in your Campaigns Recipient Filters.
Static Values
Rather than populating a field with data from Salesforce, you can provide a static value. This value will then be populated for every record imported through this integration. This is great for fields such as Touchpoint, which you may not have in Salesforce.
To toggle between mapping a field from Salesforce or a 'Static Value', press the toggle button. The cloud icon will let you map a field from Salesforce, whereas the text icon will allow you to provide a static value.
Flag Mapping
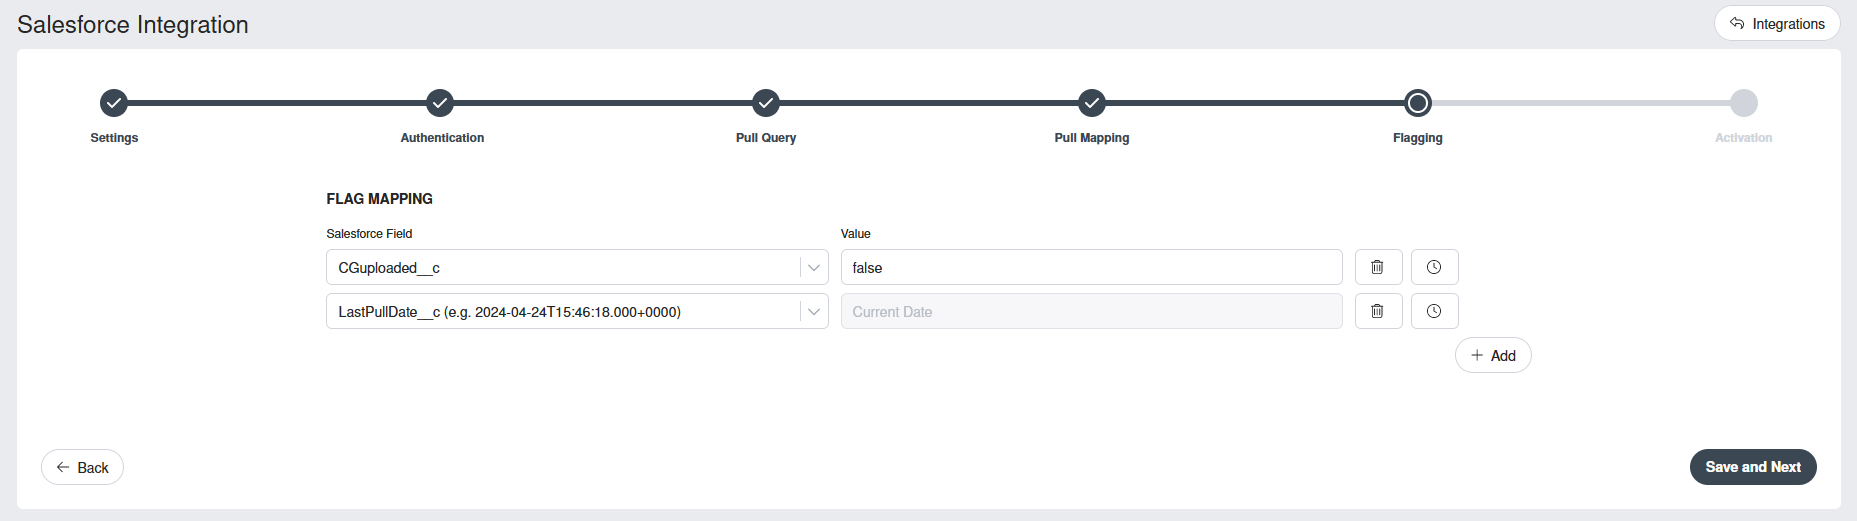
If Flagging is enabled in the Settings step, the Flagging step allows you to configure which fields get updated as part of the Pull.
You can Flag one or more fields using a static value, or the date/time of the Pull in UTC. Press the "Static Value / Pull Date" button to toggle between the two options.
Pull your flag fields
Any fields that you wish to Flag should be added to the SELECT clause of your SOQL query. When saving your query, we will validate that we can access all the fields and that your query can be executed. You do not have to add the Flag fields to your Pull Mapping (unless you wish to add this data to your survey records).
Flag only the main object
Currently, flagging is only supported on fields from the main object — the object specified in the FROM clause of your query.
Activation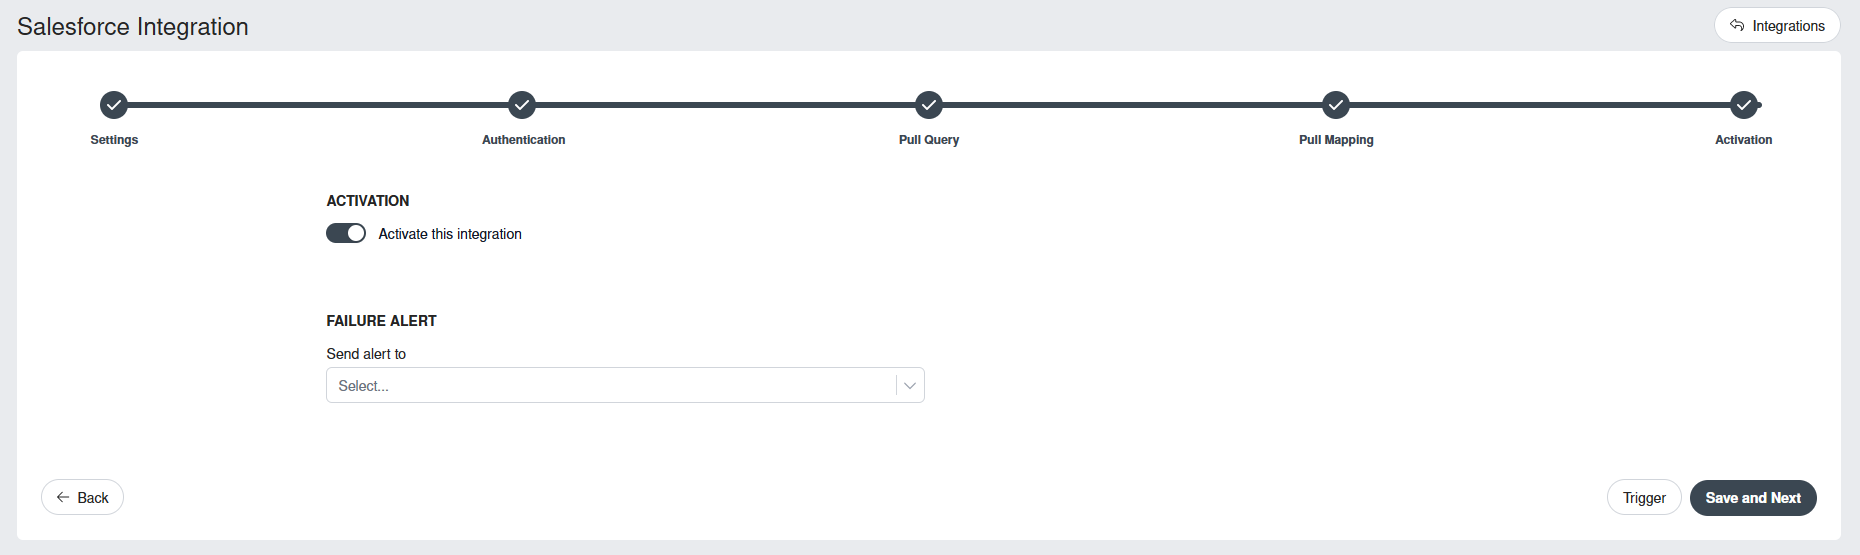
Activating the integration
When you're ready to set your integration live, you can switch the 'Activate the integration' toggle to the right. The integration will now pull automatically based on your configured Pull Frequency. Turning this off will prevent new automatic pulls from happening.
Failure Alert
You can choose any number of users to send an email alert to in the case of a failure in the off chance any of the pull or flag processes fail. We highly recommend adding your technical expert here so they can address issues as soon as possible.
Manual Pull
Press the 'Trigger' button to do a pull manually. This is especially useful while testing and adjusting the integration. The integration does not have to be activated in order to do a Manual Pull.
Examples
Testing if data enters CustomerGauge correctly
In this example we'll pull a single record, to ensure that all the data enters CustomerGauge correctly.
For this example, we'll ignore the flag — look at other examples below for a Flag use case.
Pull query:
SELECT
Id,
FirstName,
LastName,
FROM Contact
WHERE Id IN ("XXX")
Replace XXX with the Id value of the Contact you'd like to test with.
Send a survey to Contacts that haven't been pulled yet
In this example, we look at pulling some Contact data, and also preventing from pulling the same Contact again.
Pull query:
SELECT
Id,
FirstName,
LastName,
FROM Contact
WHERE Pulled_from_CG__c != true
Flag mapping:

By setting the value to "true" and using the opposite in the WHERE clause, we will never pull records a second time.
Pull Contacts to send a Relationship Survey every quarter
In this example, we look at pulling some Contact data, and also preventing from pulling the same Contact again.
Pull query:
SELECT
Id,
FirstName,
LastName,
FROM Contact
WHERE ( Last_Relationship_Survey__c = NULL OR Last_Relationship_Survey__c <= N_DAYS_AGO:90 )
Flag mapping:

By setting the value to the 'Pull Date' and using the WHERE clause to target Contacts that either have never received a Relationship Survey, or have not received one 90 days or longer ago, you can send Relationship surveys automatically on a quarterly basis.
Getting additional Account data for reporting purposes
In this example we'll be pulling information from both the Contact and Account objects in Salesforce.
Note that we don't want to over-survey the same Contact, so we'll also flag the pulled Contact to prevent pulling duplicates.
Pull query:
SELECT
  Id,
  FirstName,
  LastName,
  Email,
  Account.Name,
  Account.Id,
  Account.Owner.Email,
  Account.Owner.Name
FROM Contact
WHERE Pulled_from_CG__c != true
Contact is the main object, and we're pulling additional data from Account, as well as the Account's Owner.
Flag mapping:

By setting the value to "true" and using the opposite in the WHERE clause, we will never pull records a second time.
Send a survey when a Case in Salesforce gets closed
In this example we'll pull from the Case object in Salesforce — assuming that closing Cases would need to result in a survey.
Note that we don't want to over-survey the same Contact, so we'll also flag the pulled Contact to prevent pulling duplicates.
Pull query:
SELECT
  Contact.Id,
  Contact.FirstName,
  Contact.LastName,
  Contact.Email,
  Contact.Owner.Name,
  Id
FROM Case
WHERE Status = 'Closed' AND Contact.Pulled_from_CG__c != true
Status is a field in the Case object so it does not need a "Case." prefix (Case is the main object). Pulled_from_CG__c on the other hand comes from the Contact object, and Contact is not the main object we're pulling from.
Flag mapping:

By setting the value to "true" and using the opposite in the WHERE clause, we will never pull records a second time.
Send a Win/Loss survey when an Opportunity gets closed in Salesforce
In this example, we'll pull data from Salesforce to send out Win/Loss surveys when Opportunities get closed.
We'll also flag the Contact, so that we do not over-survey them.
This setup requires the Opportunity to have Contact Roles against it.
Pull query:
SELECT
  Contact.Id,
  Contact.FirstName,
  Contact.LastName,
  Contact.Email,
  Opportunity.Owner.Name,
  Opportunity.Owner.Email,
  Id
FROM OpportunityContactRole WHERE ( Opportunity.StageName = 'Closed Won' OR Opportunity.StageName = 'Closed Lost' ) AND Contact.Pulled_from_CG__c != false
Opportunity and Contact are normally not connected, but by using the Contact Roles as the main object, we're able to fetch data from both the Contact and Opportunity Objects.
Flag mapping:

By setting the value to "true" and using the opposite in the WHERE clause, we will never pull records a second time.
Troubleshooting
Setting up integrations can be challenging. In the sections below we've described several issues you might run into, and how to remedy them. Please keep in mind that fields can be called differently in your CustomerGauge system. This is a living section, and we will continue to expand this section as we encounter common trends.
My Accounts 'number' field is not being populated
If you're pulling data into the Account "number", but forgot to also pull data into "Account Name", it won't be stored. We use the value provided in "Account Name" as the unique identifier of our Accounts object, on which "number" resides.
To remedy this, you can do the following:
- Ensure that you're also providing an identifiable value (something that allows you to identify that particular Account) into "Account Name". This will commonly be "Account.Name" in your SOQL query.
My integration pulls less than 2,000 records
Some fields cause the SOQL query to return less data than your might expect. This is typically the case if you include a Text field (which we generally don't recommend, as CustomerGauge supports values of up to 128 characters in a field). Neither Salesforce, nor CustomerGauge can guarantee 2,000 records will be pulled.
To remedy this, you can do the following:
- Remove any Text-type fields from your SOQL Query.